Appearance
Spring Cloud Context的启动与配置加载机制
本文介绍Spring Cloud Context的Bootstrap容器启动流程以及在经典模式和现代模式下远程配置加载流程。
1. Spring Cloud Context介绍
Utilities and special services for the
ApplicationContextof a Spring Cloud application (bootstrap context, encryption, refresh scope and environment endpoints).
在参考资料2介绍中,Spring Cloud Context是为Spring Cloud应用程序的ApplicationContext(容器)提供实用工具和特殊服务的基础项目,包括引导上下文(Bootstrap容器)、配置加解密、刷新作用域(@RefreshScopr)和环境端点(Environment Endpoints)。
在本文中,主要介绍在Spring Cloud中,Bootstrap容器的启动流程、与主容器(Main ApplicationContext,也称应用容器)的关系、在经典模式和现代模式下远程配置加载等机制。
2. 经典模式
本小节介绍在经典模式中,Spring Cloud Bootstrap容器如何启动、配置如何加载,并通过nacos来说明。
TIP
Bootstrap容器是主容器的父容器,主要作用是加载外部配置。
2.1 基本案例框架
新建maven项目,pom.xml内容如下:
xml
<?xml version="1.0" encoding="UTF-8"?>
<project xmlns="http://maven.apache.org/POM/4.0.0" xmlns:xsi="http://www.w3.org/2001/XMLSchema-instance"
         xsi:schemaLocation="http://maven.apache.org/POM/4.0.0 https://maven.apache.org/xsd/maven-4.0.0.xsd">
    <modelVersion>4.0.0</modelVersion>
    <parent>
        <groupId>org.springframework.boot</groupId>
        <artifactId>spring-boot-starter-parent</artifactId>
        <version>4.1.1</version>
        <relativePath/> <!-- lookup parent from repository -->
    </parent>
    <groupId>com.example</groupId>
    <artifactId>demo</artifactId>
    <version>0.0.1-SNAPSHOT</version>
    <name>demo</name>
    <description>demo</description>

    <properties>
        <java.version>21</java.version>
        <spring-cloud.version>2025.1.3</spring-cloud.version>
    </properties>

    <dependencies>
        <dependency>
            <groupId>org.springframework.cloud</groupId>
            <artifactId>spring-cloud-starter</artifactId>
        </dependency>
    </dependencies>

    <dependencyManagement>
        <dependencies>
            <dependency>
                <groupId>org.springframework.cloud</groupId>
                <artifactId>spring-cloud-dependencies</artifactId>
                <version>${spring-cloud.version}</version>
                <type>pom</type>
                <scope>import</scope>
            </dependency>
        </dependencies>
    </dependencyManagement>

    <build>
        <plugins>
            <plugin>
                <groupId>org.springframework.boot</groupId>
                <artifactId>spring-boot-maven-plugin</artifactId>
            </plugin>
        </plugins>
    </build>

</project>主类如下:
java
@SpringBootApplication
public class DemoApplication {

    public static void main(String[] args) {
        SpringApplication.run(DemoApplication.class, args);
    }

}基于以上,我们就可以开始跟踪Spring Cloud Bootstrap容器的启动流程。
2.2 Spring Cloud Bootstrap容器启动流程
2.2.1 启用Bootstrap容器开关
在最新的Spring Cloud版本中,Bootstrap容器默认是不会创建的,为了开启Bootstrap容器创建流程,可以采用以下方式之一:
方式一:添加依赖:
xml
<dependency>
    <groupId>org.springframework.cloud</groupId>
    <artifactId>spring-cloud-starter-bootstrap</artifactId>
</dependency>注,以上项目非常简单,只有一个标志类
Marker,后续会介绍
方式二:添加启动参数:
bash
-Dspring.cloud.bootstrap.enabled=true方式三:添加启动参数:
bash
-Dspring.config.use-legacy-processing=true2.2.2 创建Bootstrap容器入口
创建Bootstrap容器由以下监听器负责:
IMPORTANT
org.springframework.cloud.bootstrap.BootstrapApplicationListener(在spring-cloud-context\META-INF\spring.factories中定义)
以上监听器监听ApplicationEnvironmentPreparedEvent事件,注意,这个事件是由主容器发出的,图示如下:
onApplicationEvent如下:
java
// ApplicationEnvironmentPreparedEvent event 这个是主容器发布的事件
@Override
public void onApplicationEvent(ApplicationEnvironmentPreparedEvent event) {
    // 从主容器中获取Environment
    ConfigurableEnvironment environment = event.getEnvironment();
    // 判断是否启用Bootstrap容器
    if (!bootstrapEnabled(environment) && !useLegacyProcessing(environment)) {
        // 如果没有启用,则直接返回,不创建Bootstrap容器
        return;
    }

    // BOOTSTRAP_PROPERTY_SOURCE_NAME就是bootstrap
    // bootstrap容器发布ApplicationEnvironmentPreparedEvent事件时,不需要再创建bootstrap容器了
    if (environment.getPropertySources().contains(BOOTSTRAP_PROPERTY_SOURCE_NAME)) {
        return;
    }

    // 当前这个主容器可能已经处在一个现有的父子 ApplicationContext 层级里,
    // bootstrap 容器可能早就已经创建好了。此时不能再重复创建一个新的 bootstrap 容器。
    // Spring Cloud 文档所说的规则:bootstrap 容器应该位于容器层级的最高层 ApplicationContext 之上。
    ConfigurableApplicationContext context = null;
    String configName = environment.resolvePlaceholders("${spring.cloud.bootstrap.name:bootstrap}");
    for (ApplicationContextInitializer<?> initializer : event.getSpringApplication().getInitializers()) {
        if (initializer instanceof ParentContextApplicationContextInitializer) {
            context = findBootstrapContext((ParentContextApplicationContextInitializer) initializer, configName);
        }
    }

    if (context == null) {
        // 以下是创建bootstrap容器的入口
        context = bootstrapServiceContext(environment, event.getSpringApplication(), configName);
        // 主容器关闭时,也需要关闭bootstrap容器
        event.getSpringApplication().addListeners(new CloseContextOnFailureApplicationListener(context));
    }

    // 主要是把bootstrap容器中的Initializer加入主容器中
    apply(context, event.getSpringApplication(), environment);
}

public static boolean bootstrapEnabled(Environment environment) {
    // 判断spring.cloud.bootstrap.enabled是否设置
    // 或者 org.springframework.cloud.bootstrap.marker.Marker 标记类是否存在,这个类就是spring-cloud-starter-bootstrap引入的
    return environment.getProperty("spring.cloud.bootstrap.enabled", Boolean.class, false) || MARKER_CLASS_EXISTS;
}

public static boolean useLegacyProcessing(Environment environment) {
    // 判断spring.config.use-legacy-processing是否设置
    return environment.getProperty("spring.config.use-legacy-processing", Boolean.class, false);
}2.2.3 创建Bootstrap容器流程
BootstrapApplicationListener.bootstrapServiceContext()是创建Bootstrap容器的方法:
java
// 参数说明
// environment 主容器的环境
// application 主容器
// config 默认为bootstrap
private ConfigurableApplicationContext bootstrapServiceContext(ConfigurableEnvironment environment,
                                                               final SpringApplication application,
                                                               String configName) {
  	// 以下都是创建Bootstrap容器的初始环境
    ConfigurableEnvironment bootstrapEnvironment = new AbstractEnvironment() {
    };
    MutablePropertySources bootstrapProperties = bootstrapEnvironment.getPropertySources();
    String configLocation = environment.resolvePlaceholders("${spring.cloud.bootstrap.location:}");
    String configAdditionalLocation = environment
        .resolvePlaceholders("${spring.cloud.bootstrap.additional-location:}");
    Map<String, Object> bootstrapMap = new HashMap<>();
  	// 这一步重要,configName默认值为bootstrap
    bootstrapMap.put("spring.config.name", configName);
    bootstrapMap.put("spring.main.web-application-type", "none");
    if (StringUtils.hasText(configLocation)) {
        bootstrapMap.put("spring.config.location", configLocation);
    }
    if (StringUtils.hasText(configAdditionalLocation)) {
        bootstrapMap.put("spring.config.additional-location", configAdditionalLocation);
    }
    // 新增名为bootstrap的环境
    bootstrapProperties.addFirst(new MapPropertySource("bootstrap", bootstrapMap));
  	// 把主容器的环境加入到Bootstrap容器中
    for (PropertySource<?> source : environment.getPropertySources()) {
        if (source instanceof StubPropertySource) {
            continue;
        }
        bootstrapProperties.addLast(source);
    }
    // 使用SpringApplicationBuilder来创建Bootstrap容器
    SpringApplicationBuilder builder = new SpringApplicationBuilder().profiles(environment.getActiveProfiles())
        .bannerMode(Mode.OFF)
        .environment(bootstrapEnvironment)
        .registerShutdownHook(false)
        .logStartupInfo(false)
        .web(WebApplicationType.NONE);
    final SpringApplication builderApplication = builder.application();
    if (builderApplication.getMainApplicationClass() == null && application.getMainApplicationClass() != null) {
      	// 设置主类,在new SpringApplicationBuilder()时就推断出主类了,所以这一步不会执行
        builder.main(application.getMainApplicationClass());
    }
    if (environment.getPropertySources().contains("refreshArgs")) {
        // If we are doing a context refresh, really we only want to refresh the
        // Environment, and there are some toxic listeners (like the
        // LoggingApplicationListener) that affect global static state, so we need a
        // way to switch those off.
      	// 刷新容器时,过滤掉带来副作用的监听器
        builderApplication.setListeners(filterListeners(builderApplication.getListeners()));
    }
  	// 重要!这一步是给Bootstrap容器中添加Bean的
    builder.sources(BootstrapImportSelectorConfiguration.class);
  	// 创建容器
    final ConfigurableApplicationContext context = builder.run();

    context.setId("bootstrap");
    // 让Bootstrap容器成为主容器的父容器
    addAncestorInitializer(application, context);
    // bootstrap容器的 Environment 在创建 bootstrap context 前,会被临时塞入一个名为 "bootstrap" 的 PropertySource;但这个 PropertySource 里的内容此时只是为了“构造 bootstrap 容器”临时使用的,并不希望它以当前形态继续留在后续 Environment 中。因此先删除,后面真正加载远程配置后,再重新加入正式的 "bootstrap" PropertySource,之后,bootstrap配置源就是远程配置。
    bootstrapProperties.remove("bootstrap");
  	// 把 bootstrap 容器真正加载出来的、允许传播给主应用的配置源合并过去。
    mergeDefaultProperties(environment.getPropertySources(), bootstrapProperties);
    return context;
}创建bootstrap容器前的环境如下:
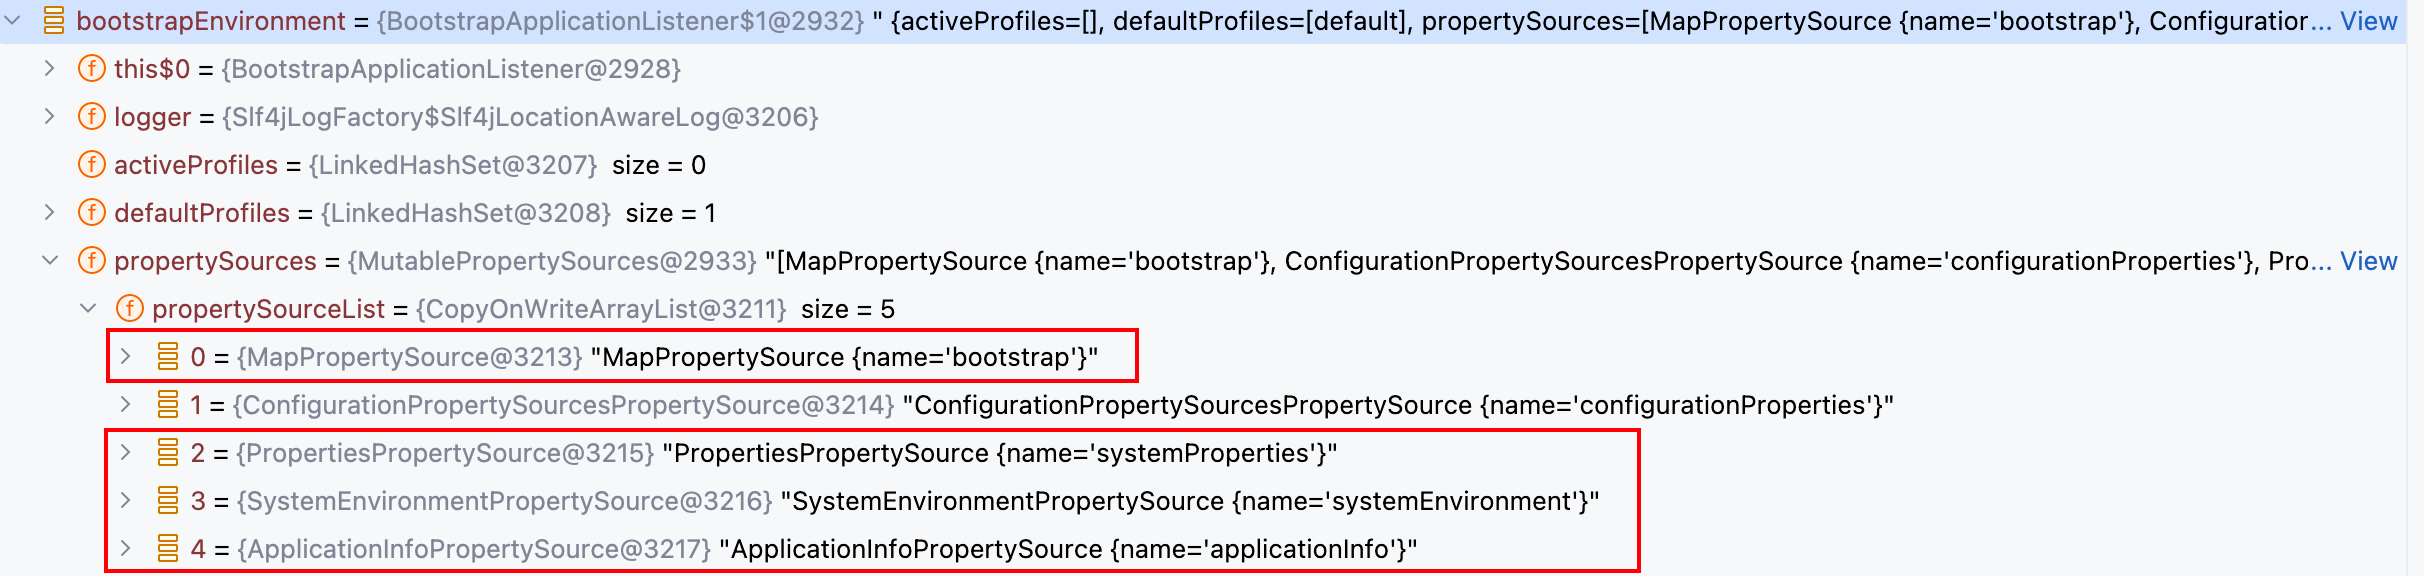
主要起作用的就是三个:
- bootstrap配置源:临时创建出来的配置源,用于加载Bootstrap容器,里面有以下属性:
spring.config.name:默认值为bootstrap,在之后用于加载bootstrap.[yml|properties];spring.main.web-application-type:默认值为none;spring.config.location:用于改变配置文件(bootstrap.yml)的位置,默认值为类路径下;spring.config.additional-location:额外配置文件路径,默认值为空;
- systemProperties:程序启动参数,从主容器加载而来的;
- systemEnvironment:系统环境变量,也是从主容器加载而来的;
- bootstrap配置源:临时创建出来的配置源,用于加载Bootstrap容器,里面有以下属性:
BootstrapImportSelectorConfiguration:在以上第55行,使用BootstrapImportSelectorConfiguration来加载额外的,最终会从spring.factories中加载key为org.springframework.cloud.bootstrap.BootstrapConfiguration的类:java// org.springframework.cloud.bootstrap.BootstrapImportSelector类 @Override public String[] selectImports(AnnotationMetadata annotationMetadata) { ClassLoader classLoader = Thread.currentThread().getContextClassLoader(); List<String> names = new ArrayList<>( SpringFactoriesLoader.loadFactoryNames(BootstrapConfiguration.class, classLoader)); String property = ""; if (this.environment != null) { property = this.environment.getProperty("spring.cloud.bootstrap.sources", ""); } names.addAll(Arrays.asList(StringUtils.commaDelimitedListToStringArray(property))); List<OrderedAnnotatedElement> elements = new ArrayList<>(); for (String name : names) { try { elements.add(new OrderedAnnotatedElement(this.metadataReaderFactory, name)); } catch (IOException e) { continue; } } AnnotationAwareOrderComparator.sort(elements); String[] classNames = elements.stream().map(e -> e.name).toArray(String[]::new); return classNames; }在Spring Cloud Context默认会引入以下类:
txtorg.springframework.cloud.bootstrap.BootstrapConfiguration=\ org.springframework.cloud.bootstrap.config.PropertySourceBootstrapConfiguration,\ org.springframework.cloud.bootstrap.encrypt.EncryptionBootstrapConfiguration,\ org.springframework.cloud.autoconfigure.ConfigurationPropertiesRebinderAutoConfiguration,\ org.springframework.boot.autoconfigure.context.PropertyPlaceholderAutoConfigurationPropertySourceBootstrapConfiguration:把远程配置源加载进Environment,“远程配置加载”的核心类;EncryptionBootstrapConfiguration:提供配置解密能力;ConfigurationPropertiesRebinderAutoConfiguration:支持配置发生变化后,重新绑定@ConfigurationPropertiesBean;PropertyPlaceholderAutoConfiguration:解析${xxx}占位符,这实际上是Spring Boot中的;
2.2.4 本地配置文件解析
本地配置文件加载是由EnvironmentPostProcessorApplicationListener负责的,根据版本不同,调用不同的加载器实现。
在Spring Boot 2.4之前,由ConfigFileApplicationListener加载配置文件,例如application.yml或bootstrap.yml文件
通过 spring.config.name 决定配置文件名称,默认值为application,如果启动的是 Bootstrap 容器,在启动前会将 spring.config.name 设置为bootstrap,所以加载的就是bootstrap.yml文件。
之后,加载配置文件由 ConfigDataEnvironmentPostProcessor 实现,后续会讲解。
以上都是Spring Boot的能力,Spring Cloud只是复用了Spring Boot容器能力。
当执行完以下代码后:
java
final ConfigurableApplicationContext context = builder.run();可以认为Bootstrap容器已创建成功。
此时,Bootstrap容器中的环境如下:

之后,执行以下代码:
java
bootstrapProperties.remove(BOOTSTRAP_PROPERTY_SOURCE_NAME);
mergeDefaultProperties(environment.getPropertySources(), bootstrapProperties);主要是把名称为bootstrap的配置源从Bootstrap容器环境中移除,然后将Bootstrap容器环境中存在而主容器环境中不存在的配置源整合为一个复合配置源(名称为defaultProperties,最新版本名称为springCloudDefaultProperties),加入到主容器环境中:
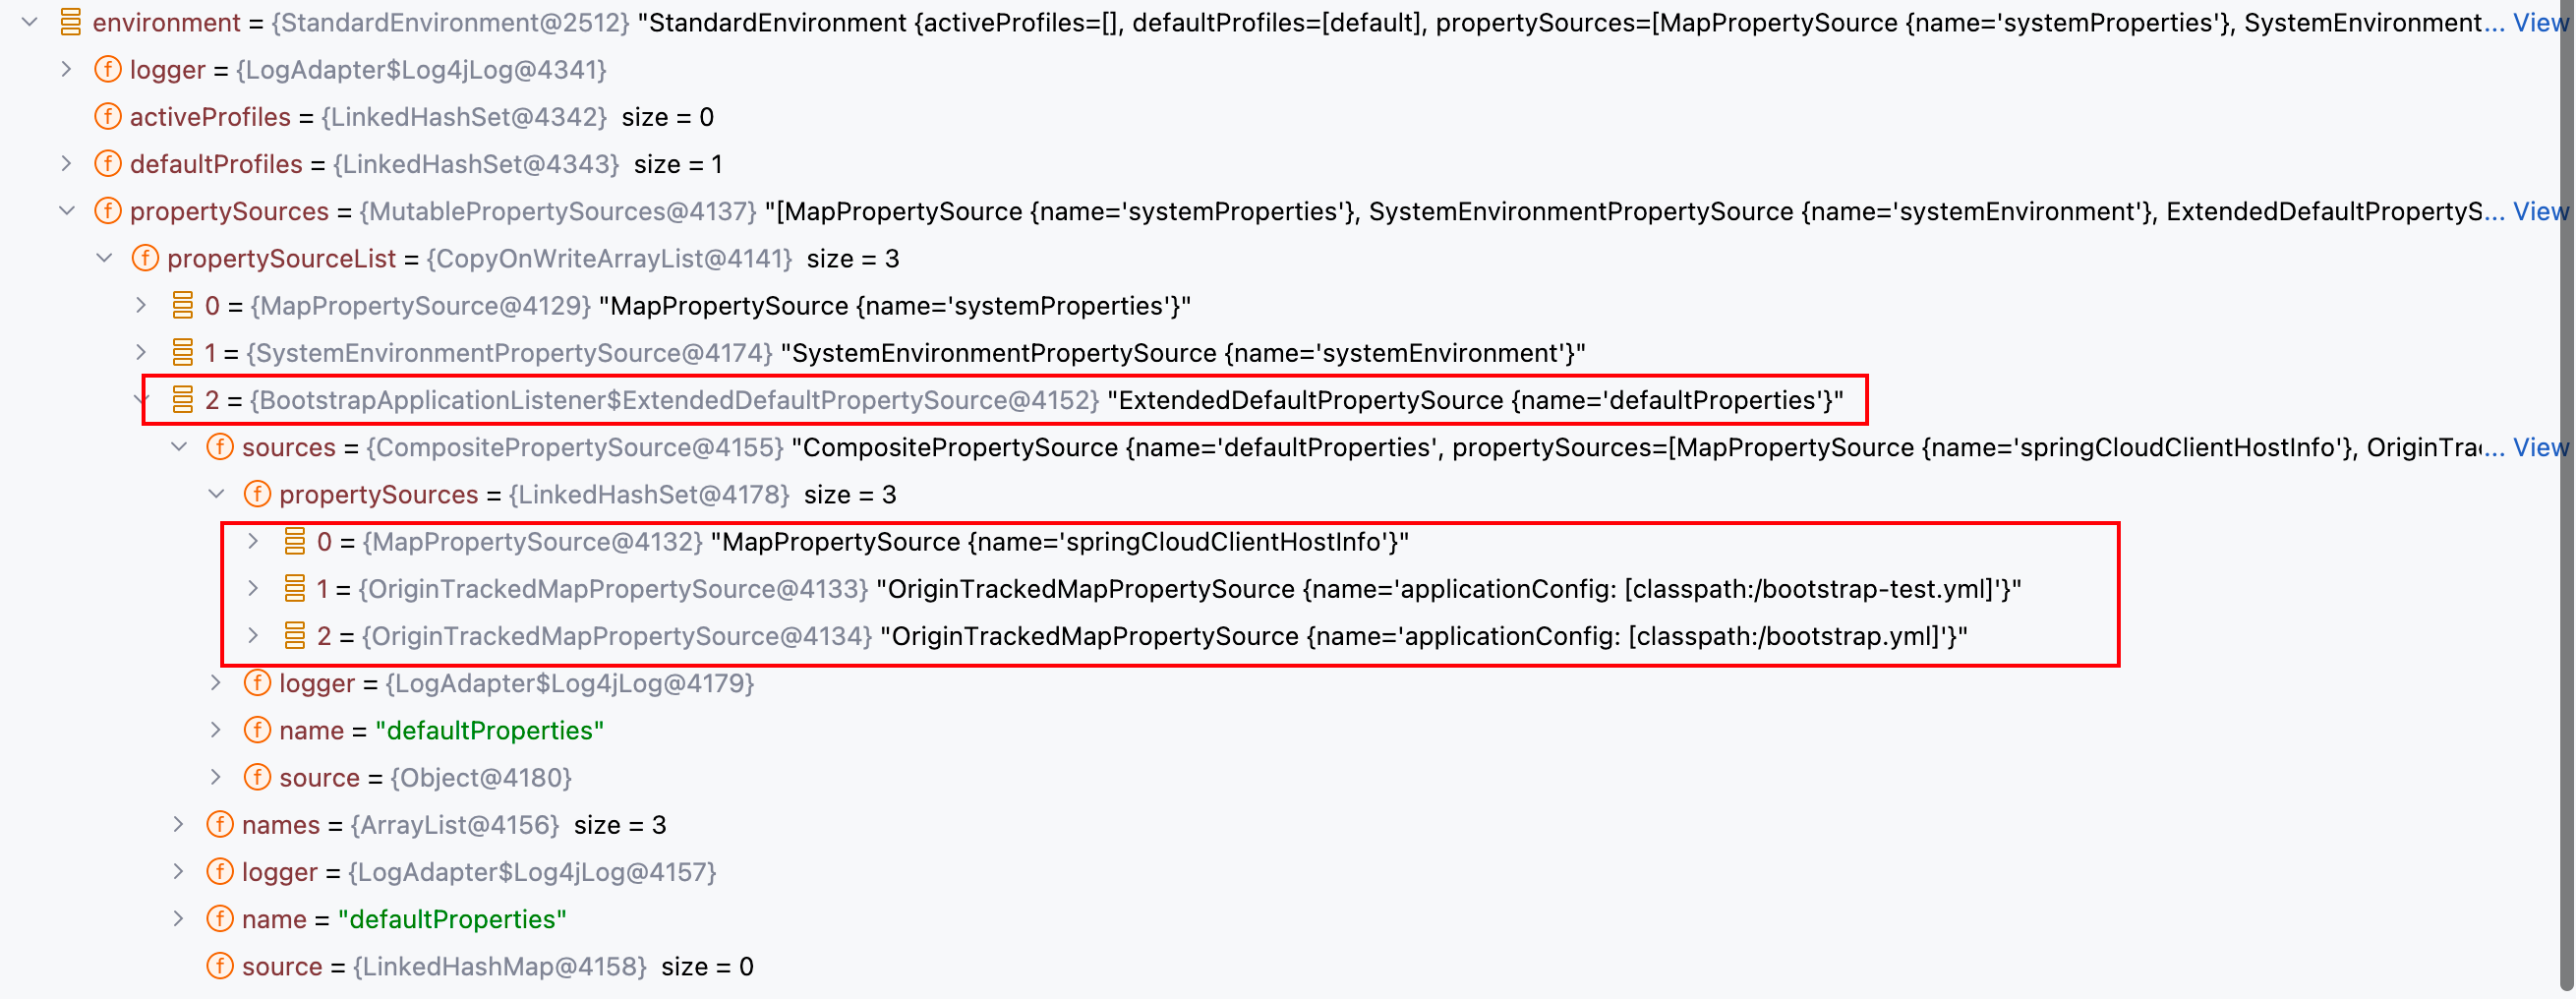
新版名称:
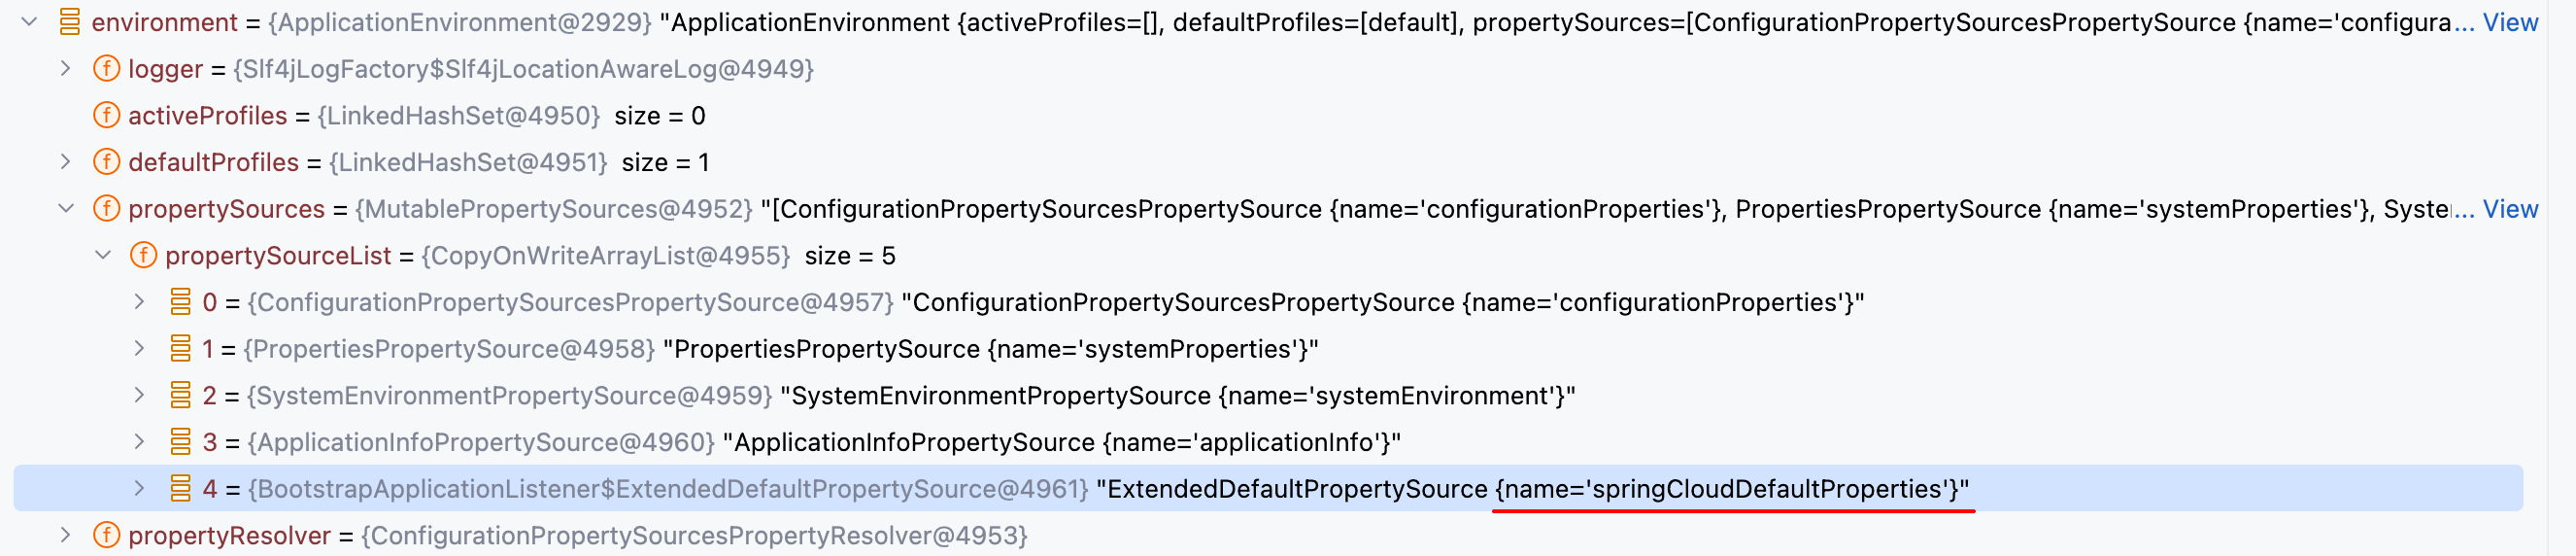
2.2.5 apply方法
当创建完容器后,会执行apply()方法,该方法的主要作用,是把Bootstrap容器中的初始化器ApplicationContextInitializer添加到主容器的初始化器中:
java
// context Bootstrap 容器
// application 主容器
// environment 主容器环境
private void apply(ConfigurableApplicationContext context, SpringApplication application,
    ConfigurableEnvironment environment) {
  // 判断主容器中有没有BootstrapMarkerConfiguration,有说明执行过该方法了,直接返回
  if (application.getAllSources().contains(BootstrapMarkerConfiguration.class)) {
    return;
  }
  // 添加BootstrapMarkerConfiguration
  application.addPrimarySources(List.of(BootstrapMarkerConfiguration.class));

  // 获取主容器的初始化器
  Set target = new LinkedHashSet<>(application.getInitializers());
  // 将Bootstrap容器中的初始化器添加到主容器中
  target.addAll(getOrderedBeansOfType(context, ApplicationContextInitializer.class));
  application.setInitializers(target);
  // 将解密能力优先级提前
  addBootstrapDecryptInitializer(application);

  // 将Bootstrap容器的Active profiles设置为主容器的Active profiles
  environment.setActiveProfiles(context.getEnvironment().getActiveProfiles());
}以上代码的关键是,Bootstrap 容器中的哪些ApplicationContextInitializer会加入到主容器中?

只有两个初始化器(就是在META-INF/spring.factories文件中key为org.springframework.cloud.bootstrap.BootstrapConfiguration定义的):
PropertySourceBootstrapConfiguration:把远程配置源加载进Environment,“远程配置加载”的核心类;EnvironmentDecryptApplicationInitializer:这是在EncryptionBootstrapConfiguration中提供的Bean,提供配置解密能力;
2.3 经典模式下Bootstrap容器启动流程图示
2.4 经典模式下远程配置加载原理
2.4.1 原理介绍
本小节介绍在经典模式下,远程配置如何加载。
从以上的启动流程图示,我们可以看到在经典模式下,远程配置加载主要是由PropertySourceBootstrapConfiguration来完成的:
java
@Configuration(proxyBeanMethods = false)
@EnableConfigurationProperties(PropertySourceBootstrapProperties.class)
public class PropertySourceBootstrapConfiguration implements ApplicationListener<ContextRefreshedEvent>,
		ApplicationContextInitializer<ConfigurableApplicationContext>, Ordered {
}从源码中,可以发现PropertySourceBootstrapConfiguration既是ApplicationListener(监听ContextRefreshedEvent事件),又是ApplicationContextInitializer,加载远程配置的核心方法如下:
java
// applicationContext 容器
// 第一次执行 doInitialize():一般是 Bootstrap ApplicationContext
// 第二次执行 doInitialize():一般是 Main ApplicationContext
private void doInitialize(ConfigurableApplicationContext applicationContext) {
  List<PropertySource<?>> composite = new ArrayList<>();
  // 获取PropertySourceLocator实现并排序,保证多个远程配置源按照指定顺序依次加载。
  AnnotationAwareOrderComparator.sort(this.propertySourceLocators);
  //标记是否完全没有加载到任何远程 PropertySource。
  // 如果最终仍然为 true,则后面的 Environment 修改、日志刷新、profile 处理都不会执行。
  boolean empty = true;
  // 获取当前容器的环境,PropertySourceLocator 基于这个 Environment 来决定加载什么远程配置,尤其会读取 applicationName、activeProfiles 等信息。
  ConfigurableEnvironment environment = applicationContext.getEnvironment();
  // 遍历PropertySourceLocator
  for (PropertySourceLocator locator : this.propertySourceLocators) {
    // 获取远程配置
    Collection<PropertySource<?>> source = locator.locateCollection(environment);
    if (source == null || source.size() == 0) {
      continue;
    }
    // 当前 Locator 返回的 PropertySource 会先包装一下,然后再加入最终的 composite。
    // 两种包装的核心目的都是:将普通 PropertySource 标记成 bootstrap PropertySource,方便后续识别、替换和管理。
    List<PropertySource<?>> sourceList = new ArrayList<>();
    for (PropertySource<?> p : source) {
      if (p instanceof EnumerablePropertySource<?> enumerable) {
        sourceList.add(new BootstrapPropertySource<>(enumerable));
      }
      else {
        sourceList.add(new SimpleBootstrapPropertySource(p));
      }
    }
    logger.info("Located property source: " + sourceList);
    composite.addAll(sourceList);
    empty = false;
  }
  // 获取到远程配置后执行
  if (!empty) {
    MutablePropertySources propertySources = environment.getPropertySources();
    String logConfig = environment.resolvePlaceholders("${logging.config:}");
    LogFile logFile = LogFile.get(environment);
    // 清除 Environment 中已有的 bootstrap PropertySource。
    // 主要是第一次在Bootstrap容器中获取的远程配置,会自动加上前缀bootstrapProperties,会传递给主容器
    for (PropertySource<?> p : environment.getPropertySources()) {
      if (p.getName().startsWith("bootstrapProperties")) {
        propertySources.remove(p.getName());
      }
    }
    // 将本次 Locator 获取到的所有远程 PropertySource,插入当前 Environment。
    insertPropertySources(propertySources, composite);
    // 重新设置日志系统
    reinitializeLoggingSystem(environment);
    setLogLevels(applicationContext, environment);
    // 处理 profile。这是第一次远程配置加载中特别关键的一步。
    handleProfiles(environment);
  }
}我们需要注意,doInitialize()可能会被调用两次,并且两次调用的容器不一样:
第一次调用,在Bootstrap容器发布
ContextRefreshedEvent事件:java@Override public void onApplicationEvent(ContextRefreshedEvent event) { // initializeOnContextRefresh设置为true并且容器类型为ConfigurableApplicationContext(也就是Bootstrap容器) if (bootstrapProperties.isInitializeOnContextRefresh() && event.getApplicationContext() instanceof ConfigurableApplicationContext) { // 如果容器目前环境中包含名为bootstrap的配置源(也就是Bootstrap容器) if (((ConfigurableApplicationContext) event.getApplicationContext()).getEnvironment() .getPropertySources() .contains(BootstrapApplicationListener.BOOTSTRAP_PROPERTY_SOURCE_NAME)) { // 调用doInitialize() doInitialize((ConfigurableApplicationContext) event.getApplicationContext()); } } }第一次调用主要是获取远程默认配置,以便获得active profiles。
第二次调用,在主容器中,通过调用initializer触发:
java@Override public void initialize(ConfigurableApplicationContext applicationContext) { // initializeOnContextRefresh设置为false 或 容器中没有包含名为bootstrap的配置源 if (!bootstrapProperties.isInitializeOnContextRefresh() || !applicationContext.getEnvironment() .getPropertySources() .contains(BootstrapApplicationListener.BOOTSTRAP_PROPERTY_SOURCE_NAME)) { doInitialize(applicationContext); } }第二次调用就可以根据 active profiles,获取远程配置。
在主容器调用initializer时,列表如下:
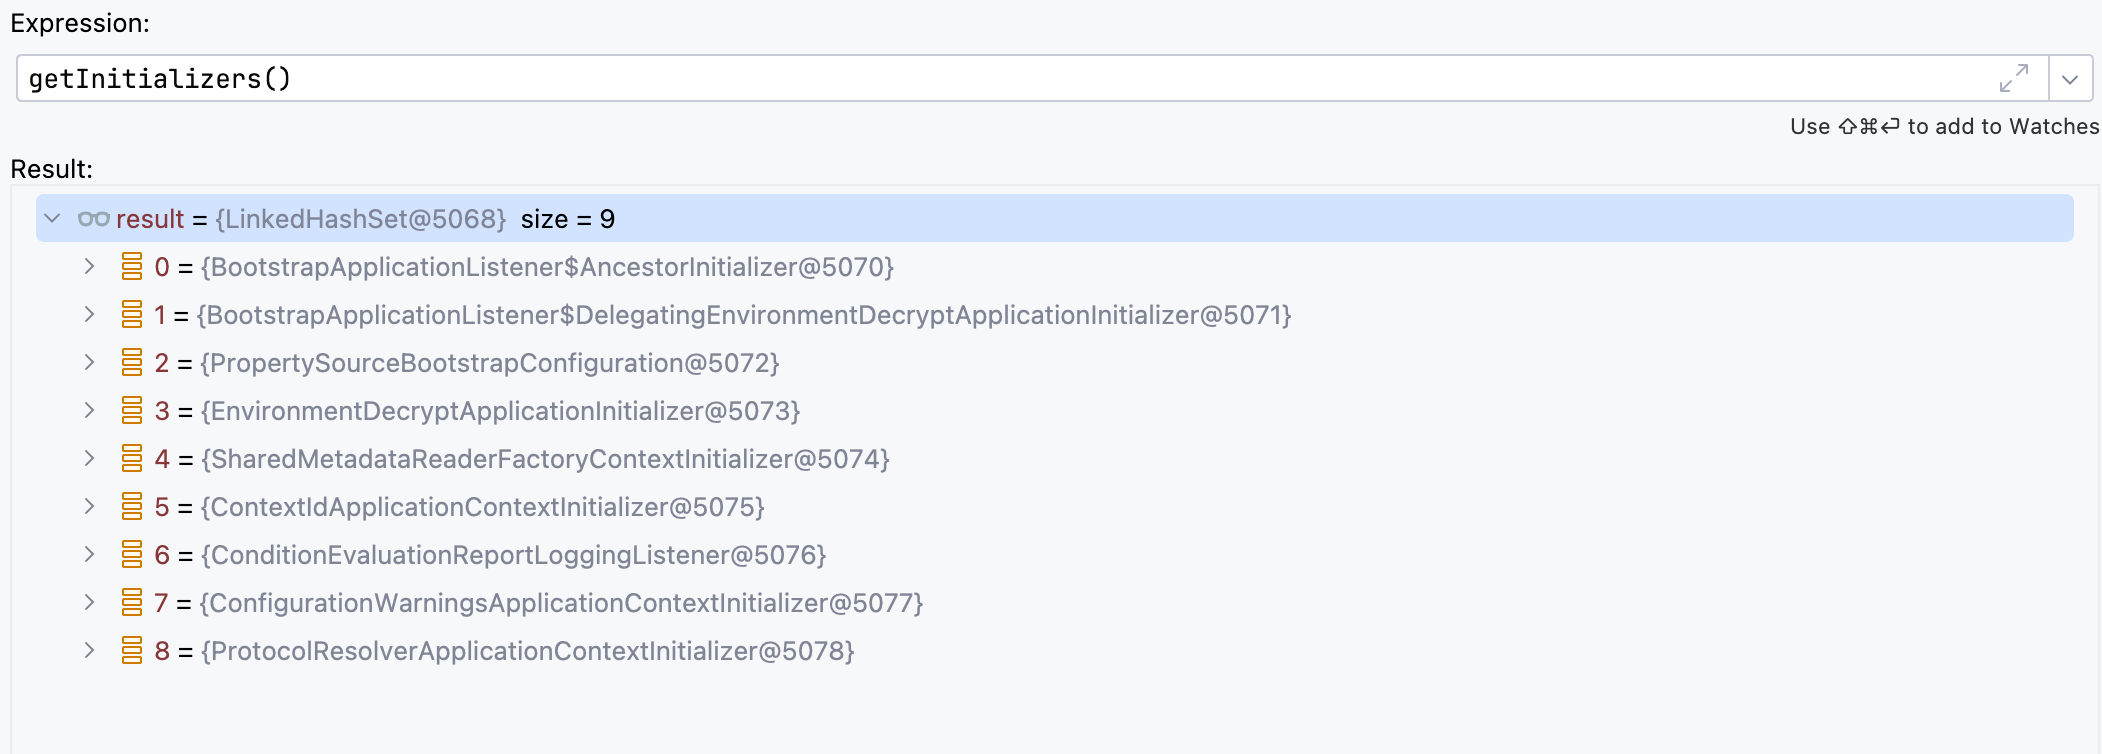
可以看到第3个就是
PropertySourceBootstrapConfiguration。
2.4.2 实践
本小节我们自己实现PropertySourceLocator,来模拟实现远程配置加载。
java
package com.lee.contextdemo.config;

import org.springframework.cloud.bootstrap.config.PropertySourceLocator;
import org.springframework.core.env.ConfigurableEnvironment;
import org.springframework.core.env.Environment;
import org.springframework.core.env.MapPropertySource;
import org.springframework.core.env.PropertySource;
import java.util.HashMap;
import java.util.Map;

public class MyPropertySourceLocator implements PropertySourceLocator {
    @Override
    public PropertySource<?> locate(Environment environment) {
        if (((ConfigurableEnvironment)environment).getPropertySources().contains("bootstrap")){
            // 第一次调用:Bootstrap容器调用
            Map<String, Object> map = new HashMap<>();
            map.put("spring.profiles.active", "my,prod");

            MapPropertySource mapPropertySource = new MapPropertySource("first", map);
            return mapPropertySource;
        }
        // 第二次调用:主容器调用
        Map<String, Object> map = new HashMap<>();
        map.put("remote.settings", environment.getActiveProfiles());

        MapPropertySource mapPropertySource = new MapPropertySource("second", map);
        return mapPropertySource;
    }
}然后需要将以上实现作为Bean加入到 Bootstrap 容器中,在自己项目类路径下的META- INF/spring.factories添加以下内容:
txt
org.springframework.cloud.bootstrap.BootstrapConfiguration=\
com.lee.contextdemo.config.MyPropertySourceLocator在创建Bootstrap容器时,还记得以下代码:
// 重要!这一步是给Bootstrap容器中添加Bean的 builder.sources(BootstrapImportSelectorConfiguration.class);
配置文件如下:
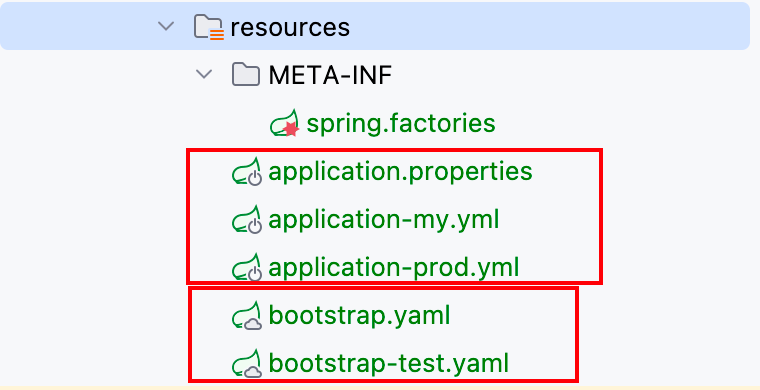
然后获取主容器所有的配置源:
java
public static void main(String[] args) {
    ConfigurableApplicationContext mainApp =
            SpringApplication.run(ContextDemoApplication.class, args);

    ConfigurableEnvironment environment =mainApp.getEnvironment();
    MutablePropertySources propertySources = environment.getPropertySources();
    for (PropertySource<?> propertySource : propertySources) {
        System.out.println("name = " + propertySource.getName());
    }
}结果如下:
txt
name = bootstrapProperties-second
name = configurationProperties
name = systemProperties
name = systemEnvironment
name = random
name = cachedrandom
name = Config resource 'class path resource [application-prod.yml]' via location 'optional:classpath:/'
name = Config resource 'class path resource [application-my.yml]' via location 'optional:classpath:/'
name = Config resource 'class path resource [application.properties]' via location 'optional:classpath:/'
name = springCloudClientHostInfo
name = applicationConfig: [classpath:/application-prod.yml]
name = applicationConfig: [classpath:/application-my.yml]
name = applicationConfig: [classpath:/application.properties]
name = applicationInfo
name = Config resource 'class path resource [bootstrap-test.yaml]' via location 'optional:classpath:/'
name = Config resource 'class path resource [bootstrap.yaml]' via location 'optional:classpath:/'
name = applicationConfig: [classpath:/bootstrap-test.yaml]
name = applicationConfig: [classpath:/bootstrap.yaml]
name = springCloudDefaultProperties有重复的配置源,是因为BootstrapConfigFileApplicationListener和EnvironmentPostProcessorApplicationListener加载了两次
在启用Bootstrap容器的情况下,BootstrapConfigFileApplicationListener会发挥作用
可以看到,bootstrapProperties-second配置源成功加载进来,模拟了远程配置加载;并且application-prod.yml和application-my.yml也成功加载,说明第一次获取到的active profiles也成功起作用了。
这也就是Nacos这种配置中心早期实现的原理。
3. 现代模式
在现代模式下,不会创建Bootstrap容器,而是通过Spring Boot的spring.config.import机制,加载外部配置。
3.1 原理
3.1.1 ConfigDataResource\ConfigDataLoader\ConfigData
ConfigDataResource:一个真正可加载的配置资源的抽象,例如某个具体 YAML 文件、配置中心资源;ConfigDataLoader<R>接口:负责把某个ConfigDataResource真正加载成ConfigData;ConfigData:已经加载完成的配置数据,内部通常包含一个或多个PropertySource;
总结来说,ConfigDataLoader用于将资源ConfigDataResource转换为ConfigData,ConfigData包含配置源,后续可以加入到容器环境中。
ConfigDataLoader是一个接口,其中定义了可以加载哪种资源以及加载方法,根据不同实现,可以完成不同资源的加载:
java
public interface ConfigDataLoader<R extends ConfigDataResource> {

	default boolean isLoadable(ConfigDataLoaderContext context, R resource) {
		return true;
	}

	@Nullable ConfigData load(ConfigDataLoaderContext context, R resource)
			throws IOException, ConfigDataResourceNotFoundException;

}ConfigDataResource是一个抽象类,表示单个资源,其实现需要 equals、 hashCode和toString方法,用于唯一确定资源:
java
public abstract class ConfigDataResource {

	private final boolean optional;

	public ConfigDataResource() {
		this(false);
	}

	protected ConfigDataResource(boolean optional) {
		this.optional = optional;
	}

	boolean isOptional() {
		return this.optional;
	}

}ConfigData中包含多个PropertySource:
java
public final class ConfigData {

	private final List<PropertySource<?>> propertySources;
}ConfigDataLoaders:是Loader 的统一调度器,根据 Resource 类型找到对应的 ConfigDataLoader。
java
class ConfigDataLoaders {
	private final List<ConfigDataLoader> loaders;

  <R extends ConfigDataResource> @Nullable ConfigData load(ConfigDataLoaderContext context, R resource)
			throws IOException {
    // 找到适合的ConfigDataLoader
		ConfigDataLoader<R> loader = getLoader(context, resource);
    // 将resource加载为ConfigData
		return loader.load(context, resource);
	}

}3.1.2 ConfigDataLocation\ConfigDataLocationResolver
ConfigDataLocation:表示一个配置位置,比如classpath:/、file:./config/、optional:xxx,可以认为就是字符串的简单包装;ConfigDataLocationResolver<R>接口:负责把ConfigDataLocation解析为一个或多个ConfigDataResource;ConfigDataLocationResolvers:Resolver 的统一调度器。找到能够处理当前ConfigDataLocation的ConfigDataLocationResolver;
总结一句话,ConfigDataLocationResolver负责将配置位置ConfigDataLocation解析为ConfigDataResource。
TIP
ConfigDataLocation和ConfigDataResource有什么区别,似乎都表示配置位置?
ConfigDataLocation 是“用户写的配置地址”,ConfigDataResource 是“经过解析后得到的、可以真正被加载的具体资源”。
假设配置spring.config.import=classpath:/config/
那么 classpath:/config/先被表示为ConfigDataLocation,经过ConfigDataLocationResolver解析后,可能得到多个资源:
ConfigDataResource:classpath:/config/application.ymlConfigDataResource:classpath:/config/application-dev.yml
ConfigDataLocation用于表示配置位置,可以认为是字符串的简单包装:
java
public final class ConfigDataLocation implements OriginProvider {

	private static final ConfigDataLocation EMPTY = new ConfigDataLocation(false, "", null);

	/**
	 * Prefix used to indicate that a {@link ConfigDataResource} is optional.
	 */
	public static final String OPTIONAL_PREFIX = "optional:";

	private final boolean optional;

	private final String value;

	private final @Nullable Origin origin;

	private ConfigDataLocation(boolean optional, String value, @Nullable Origin origin) {
		this.value = value;
		this.optional = optional;
		this.origin = origin;
	}
}ConfigDataLocationResolver接口定义了将ConfigDataLocation解析为ConfigDataResource的方法:
java
public interface ConfigDataLocationResolver<R extends ConfigDataResource> {

  // 判断该Resolver能不能解析ConfigDataLocation
	boolean isResolvable(ConfigDataLocationResolverContext context, ConfigDataLocation location);

  // 基础解析:把一个 ConfigDataLocation 解析成一个或多个具体的 ConfigDataResource
	List<R> resolve(ConfigDataLocationResolverContext context, ConfigDataLocation location)
			throws ConfigDataLocationNotFoundException, ConfigDataResourceNotFoundException;

  // 根据已经推导出来的 active profiles 补充 Profile-specific resources
	default List<R> resolveProfileSpecific(ConfigDataLocationResolverContext context, ConfigDataLocation location,
			Profiles profiles) throws ConfigDataLocationNotFoundException {
		return Collections.emptyList();
	}

}ConfigDataLocationResolvers封装了一系列ConfigDataLocationResolver:
java
class ConfigDataLocationResolvers {

  // 一系列ConfigDataLocationResolver
	private final List<ConfigDataLocationResolver<?>> resolvers;

  	List<ConfigDataResolutionResult> resolve(ConfigDataLocationResolverContext context,
			@Nullable ConfigDataLocation location, @Nullable Profiles profiles) {
		if (location == null) {
			return Collections.emptyList();
		}
		for (ConfigDataLocationResolver<?> resolver : getResolvers()) {
      // 判断该resolver能不能解析 location
			if (resolver.isResolvable(context, location)) {
        // 解析
				return resolve(resolver, context, location, profiles);
			}
		}
		throw new UnsupportedConfigDataLocationException(location);
	}

	private List<ConfigDataResolutionResult> resolve(ConfigDataLocationResolver<?> resolver,
			ConfigDataLocationResolverContext context, ConfigDataLocation location, @Nullable Profiles profiles) {
    // 先调用基础解析resolve()
		List<ConfigDataResolutionResult> resolved = resolve(location, false, () -> resolver.resolve(context, location));
		if (profiles == null) {
			return resolved;
		}
    // 再调用resolveProfileSpecific(), 解析 Profile-specific resources
		List<ConfigDataResolutionResult> profileSpecific = resolve(location, true,
				() -> resolver.resolveProfileSpecific(context, location, profiles));
		return merge(resolved, profileSpecific);
	}

  private List<ConfigDataResolutionResult> resolve(ConfigDataLocation location, boolean profileSpecific,
			Supplier<List<? extends ConfigDataResource>> resolveAction) {
		List<ConfigDataResource> resources = nonNullList(resolveAction.get());
		List<ConfigDataResolutionResult> resolved = new ArrayList<>(resources.size());
		for (ConfigDataResource resource : resources) {
			resolved.add(new ConfigDataResolutionResult(location, resource, profileSpecific));
		}
		return resolved;
	}
}3.1.3 ConfigDataImporter
ConfigDataImporter可以理解为一个工具类,其中维护了ConfigDataLocationResolvers和ConfigDataLoaders,分两阶段将多个ConfigDataLocation解析为ConfigData:
- 第一阶段
resolve:先将所有的ConfigDataLocation解析为ConfigDataResource; - 第二阶段
load:将所有的ConfigDataResource解析为ConfigData;
并且,ConfigDataImporter还会跟踪ConfigDataResource状态,确保同一个资源不会被加载多次。
java
class ConfigDataImporter {

	private final ConfigDataLocationResolvers resolvers;

	private final ConfigDataLoaders loaders;

  // 已加载的ConfigDataResource
	private final Set<ConfigDataResource> loaded = new HashSet<>();
  // 已加载的ConfigDataLocation
	private final Set<ConfigDataLocation> loadedLocations = new HashSet<>();
	// 可选的路径:如果路径是可选的,那么当该路径不存在时,不会抛出异常
	private final Set<ConfigDataLocation> optionalLocations = new HashSet<>();

  Map<ConfigDataResolutionResult, ConfigData> resolveAndLoad(@Nullable ConfigDataActivationContext activationContext,
			ConfigDataLocationResolverContext locationResolverContext, ConfigDataLoaderContext loaderContext,
			List<ConfigDataLocation> locations) {
		try {
      // 获取 active profiles
			Profiles profiles = (activationContext != null) ? activationContext.getProfiles() : null;
      // 先解析
			List<ConfigDataResolutionResult> resolved = resolve(locationResolverContext, profiles, locations);
      // 再加载
			return load(loaderContext, resolved);
		}
		catch (IOException ex) {
			throw new IllegalStateException("IO error on loading imports from " + locations, ex);
		}
	}
}3.1.4 ConfigDataEnvironmentContributor
A single element that may directly or indirectly contribute configuration data to the Environment.
ConfigDataEnvironmentContributor表示一个“可能直接或间接向 Environment 贡献配置数据的节点”。
有点抽象,难以理解。
假如现有项目类路径下有以下配置文件:
txt
resources:
	a.yaml
	application.yaml
	b.yaml
c.yaml那么可以简单把ConfigDataEnvironmentContributor对象理解为一个配置文件,也就是说有四个ConfigDataEnvironmentContributor对象。
假设各配置文件内容如下:
yaml
# application.yaml
spring:
  application:
    name: demo
  profiles:
    active: test
  config:
    import:
      - "classpath:a.yaml"
      - "optional:classpath:b.yaml"


# a.yaml
spring:
    import:
- "classpath:c.yaml"可以发现,是application.yaml引入了a.yaml和b.yaml配置,而a.yaml又引入了c.yaml,所以可以很形象用树形结构表示:
所以,ConfigDataEnvironmentContributor也是用树形来组织各个配置文件的:
java
class ConfigDataEnvironmentContributor implements Iterable<ConfigDataEnvironmentContributor> {
	private final Map<ImportPhase, List<ConfigDataEnvironmentContributor>> children;
}那application.yaml又是如何引入构建的呢?约定俗成,Spring Boot会获取类路径下的application.yaml配置文件。但并不是直接获取的,而是通过一些初始的ConfigDataEnvironmentContributor节点,类似如下:
这里的初始化节点又是从哪里来的呢?从容器最初始的配置源和一些特殊属性而来的。源码如下:
java
// ConfigDataEnvironment#createContributors(Binder)
private ConfigDataEnvironmentContributors createContributors(Binder binder) {
    this.logger.trace("Building config data environment contributors");
    // 获取容器环境中的初始配置源(包括系统环境变量、启动参数等)
    MutablePropertySources propertySources = this.environment.getPropertySources();
    List<ConfigDataEnvironmentContributor> contributors = new ArrayList<>(propertySources.size() + 10);
    PropertySource<?> defaultPropertySource = null;
    // 遍历初始配置源,为每一个配置源创建一个ConfigDataEnvironmentContributor
    for (PropertySource<?> propertySource : propertySources) {
        if (DefaultPropertiesPropertySource.hasMatchingName(propertySource)) {
            defaultPropertySource = propertySource;
        }
        else {
            this.logger.trace(LogMessage.format("Creating wrapped config data contributor for '%s'",
                                                propertySource.getName()));
            contributors.add(ConfigDataEnvironmentContributor.ofExisting(propertySource,
                                                                         this.environment.getConversionService()));
        }
    }
    // 根据特殊属性,创建ConfigDataEnvironmentContributor
    contributors.addAll(getInitialImportContributors(binder));
    // 如果初始配置源中有默认配置名称(defaultProperties),也创建一个ConfigDataEnvironmentContributor
    if (defaultPropertySource != null) {
        this.logger.trace("Creating wrapped config data contributor for default property source");
        contributors.add(ConfigDataEnvironmentContributor.ofExisting(defaultPropertySource,
                                                                     this.environment.getConversionService()));
    }
    return createContributors(contributors);
}getInitialImportContributors()方法如下,主要是从容器初始环境中解析三个特殊配置属性,根据这些属性创建ConfigDataEnvironmentContributor:
java
private List<ConfigDataEnvironmentContributor> getInitialImportContributors(Binder binder) {
    List<ConfigDataEnvironmentContributor> initialContributors = new ArrayList<>();
    // 根据配置 spring.config.import 创建
    addInitialImportContributors(initialContributors, binder, IMPORT_PROPERTY, EMPTY_LOCATIONS, false);
    // 根据配置 spring.config.additional-location 创建
    addInitialImportContributors(initialContributors, binder, ADDITIONAL_LOCATION_PROPERTY, EMPTY_LOCATIONS, true);
    // 根据配置 spring.config.location 创建
    addInitialImportContributors(initialContributors, binder, LOCATION_PROPERTY, DEFAULT_SEARCH_LOCATIONS, true);
    return initialContributors;
}

// 默认值
static final ConfigDataLocation[] DEFAULT_SEARCH_LOCATIONS;
static {
    List<ConfigDataLocation> locations = new ArrayList<>();
    locations.add(ConfigDataLocation.of("optional:classpath:/;optional:classpath:/config/"));
    locations.add(ConfigDataLocation.of("optional:file:./;optional:file:./config/;optional:file:./config/*/"));
    DEFAULT_SEARCH_LOCATIONS = locations.toArray(new ConfigDataLocation[0]);
}

private static final ConfigDataLocation[] EMPTY_LOCATIONS = new ConfigDataLocation[0];

// initialContributors添加ConfigDataEnvironmentContributor
private void addInitialImportContributors(List<ConfigDataEnvironmentContributor> initialContributors, Binder binder,
                                          String propertyName, ConfigDataLocation[] defaultValue, boolean registerIndividually) {
    // 从配置中获取 ConfigDataLocation 值,如果没有,就使用默认值defaultValue
    ConfigDataLocation[] locations = binder.bind(propertyName, CONFIG_DATA_LOCATION_ARRAY).orElse(defaultValue);
    if (registerIndividually) {
        // 如果是分别注册
        for (int i = locations.length - 1; i >= 0; i--) {
            // 则每一个ConfigDataLocation都会创建一个 ConfigDataEnvironmentContributor
            addInitialImportContributors(initialContributors, List.of(locations[i]));
        }
    }
    else {
        // 总的创建一个 ConfigDataEnvironmentContributor
        addInitialImportContributors(initialContributors, List.of(locations));
    }
}

private void addInitialImportContributors(List<ConfigDataEnvironmentContributor> initialContributors,
                                          List<ConfigDataLocation> locations) {
    if (!locations.isEmpty()) {
        this.logger.trace(LogMessage.format("Adding initial config data import from locations %s", locations));
        // 创建 ConfigDataEnvironmentContributor
        ConfigDataEnvironmentContributor contributor =
            ConfigDataEnvironmentContributor.ofInitialImports(locations, this.environment.getConversionService());
        // 假如列表
        initialContributors.add(contributor);
    }
}调试查看创建的初始ConfigDataEnvironmentContributor,发现一共有8个:
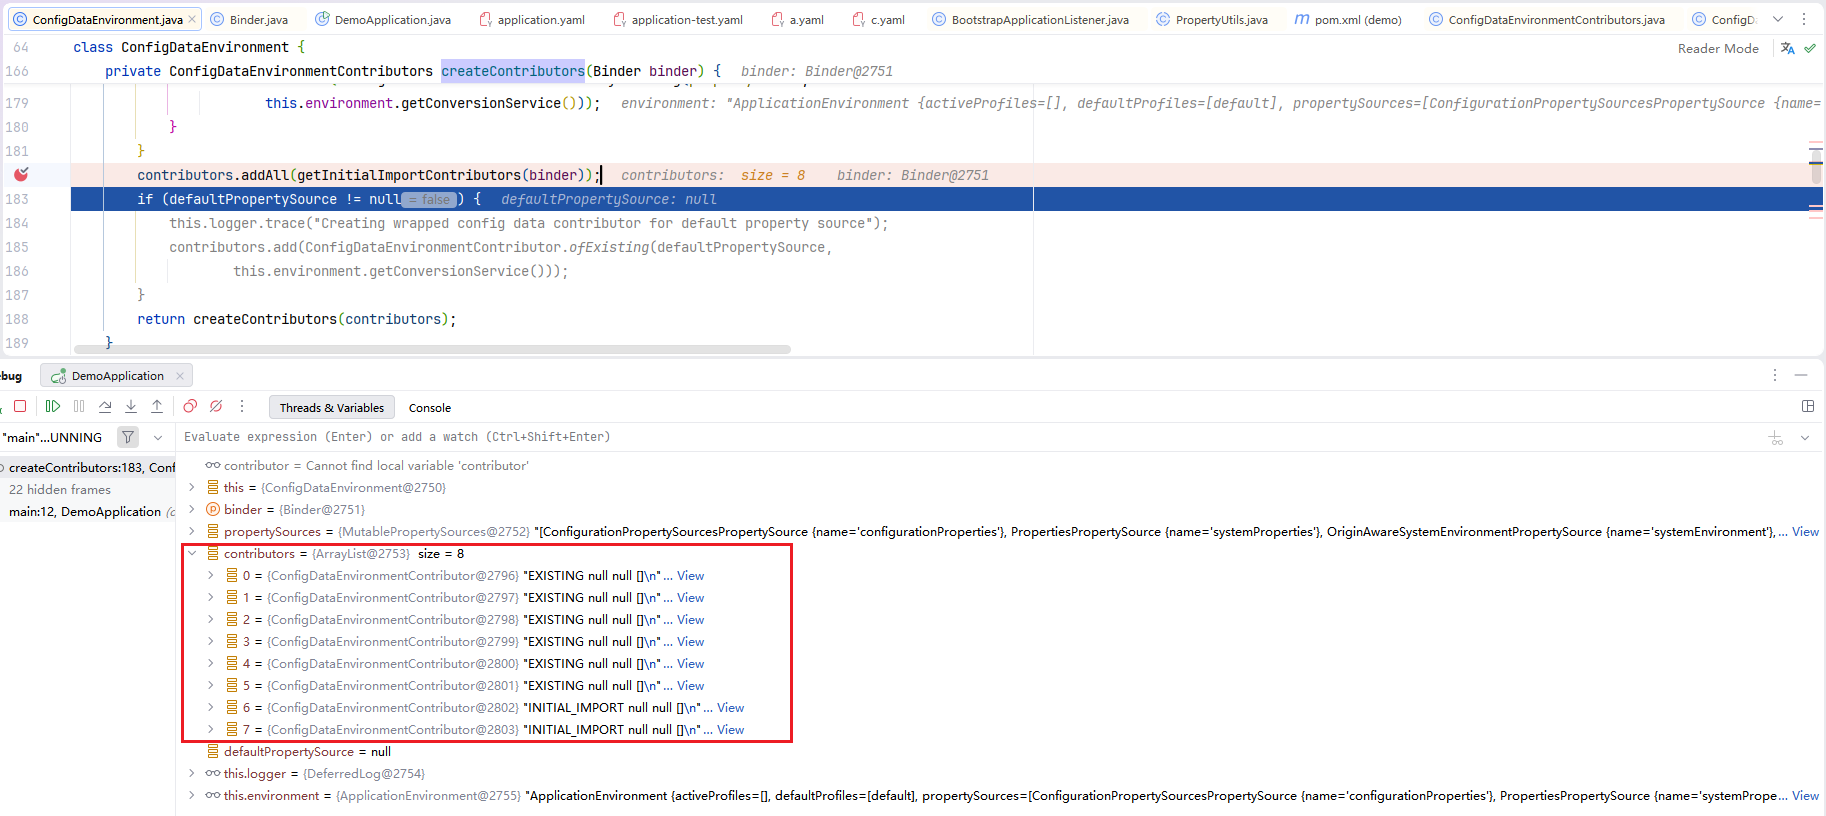
前6个是根据环境中的属性源创建的(类型为EXISTING),后两个是特殊属性解析创建而来的(类型为INITIAL_IMPORT),其中的properties.imports值分别为:
- ["optional:file:./;optional:file:./config/;optional:file:./config/*/"]
- ["optional:classpath:/;optional:classpath:/config/"]
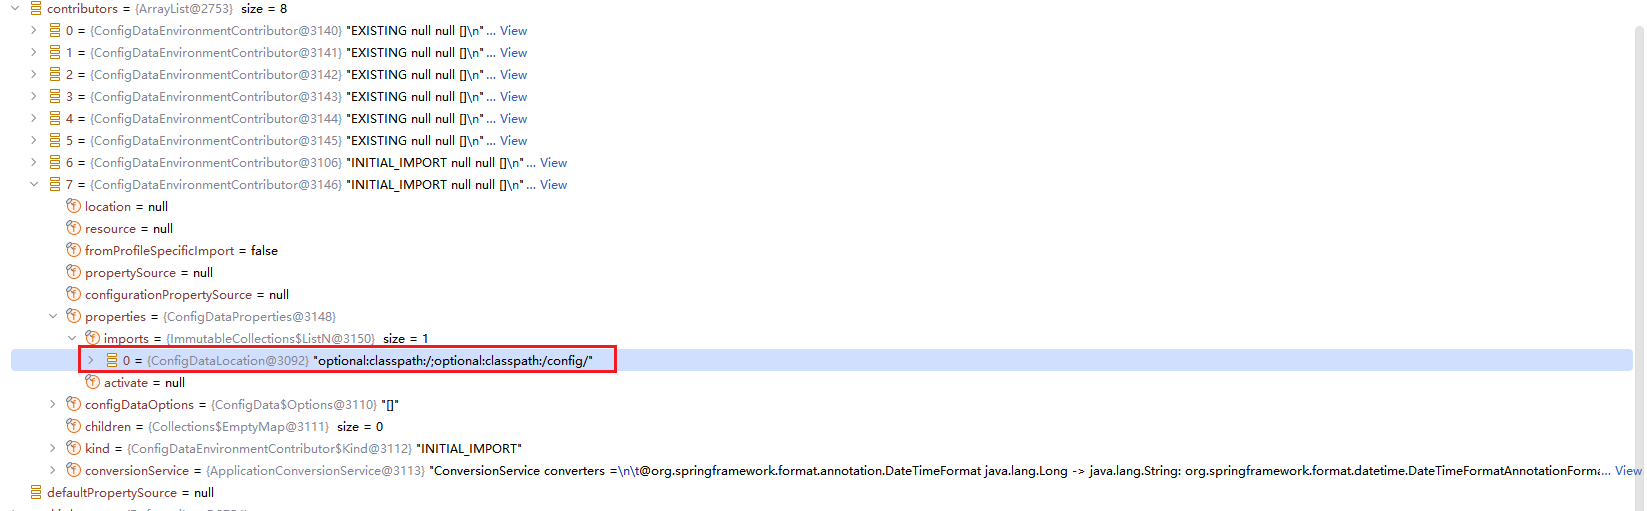
小结一下,目前我们了解了ConfigDataEnvironmentContributor的层级结构,并且前面说可以认为一个配置文件对应一个ConfigDataEnvironmentContributor对象,其实这是不准确的,从以上源码就可以看出,ConfigDataEnvironmentContributor对象可以来自配置源(PropertySource),也可以来自配置位置(ConfigDataLocation)。
在Spring Boot中,在初始节点之上,还有一个根节点:
java
// org.springframework.boot.context.config.ConfigDataEnvironmentContributor#of
// contributors 就是一些初始节点
static ConfigDataEnvironmentContributor of(List<ConfigDataEnvironmentContributor> contributors,
                                           ConversionService conversionService) {
    Map<ImportPhase, List<ConfigDataEnvironmentContributor>> children = new LinkedHashMap<>();
    children.put(ImportPhase.BEFORE_PROFILE_ACTIVATION, Collections.unmodifiableList(contributors));
    return new ConfigDataEnvironmentContributor(Kind.ROOT, null, null, false, null, null, null, null, children,
                                                conversionService);
}整个树结构如下:
在以上的源码中,我们可以发现,每个ConfigDataEnvironmentContributor都是有一个类型Kind的,类型枚举值如下:
java
enum Kind {
	// 根节点。本身不直接代表某份配置数据,主要用于持有最初的一批子 contributor。
    ROOT,

    // 初始导入节点。
    // 表示启动阶段就需要处理的 ConfigDataLocation,
    // 例如 spring.config.location、spring.config.additional-location、
    // 以及默认搜索位置等生成的初始导入入口。
    INITIAL_IMPORT,

    // 已经存在于 Environment 中的 PropertySource。
    // 它可以贡献配置属性,但不会再产生新的 spring.config.import。
    EXISTING,

    // 已经通过 import 加载出了 ConfigData,
    // 但还没有通过 Binder 绑定出 ConfigDataProperties。
    // 此时还不知道它的 spring.config.import、spring.config.activate.* 等元信息。
    UNBOUND_IMPORT,

    // 已经完成绑定的 import 节点。
    // ConfigDataProperties 已经解析完成,
    // Spring Boot 已经知道该配置的 imports、activate 条件等信息。
    BOUND_IMPORT,

    // ConfigDataLocation 本身合法,也已经处理过,
    // 但该位置最终没有任何 ConfigData 可以加载。
    EMPTY_LOCATION
}There are several kinds of contributor, all are immutable and will be replaced with new versions as imports are processed.
ConfigDataEnvironmentContributor具有多种类型,并且是一个不可变对象,随着解析的进行,会生成一个新的对象,替换旧的,而不是直接在旧对象上修改属性。
这里主要是理解UNBOUND_IMPORT --> BOUND_IMPORT的转变(可以理解为状态的变化,但实际上是对象替换)。
暂停一下,我们先看两个工具类:
ConfigDataProperties:它是 Spring Boot 在 Config Data 处理阶段,用来承载“某一份 ConfigData 自己声明的加载控制信息”的内部绑定模型。javaclass ConfigDataProperties { private static final ConfigurationPropertyName NAME = ConfigurationPropertyName.of("spring.config"); private static final Bindable<ConfigDataProperties> BINDABLE_PROPERTIES = Bindable.of(ConfigDataProperties.class); private final List<ConfigDataLocation> imports; private final @Nullable Activate activate; ConfigDataProperties(@Nullable @Name("import") List<ConfigDataLocation> imports, @Nullable Activate activate) { this.imports = (imports != null) ? imports.stream().filter(ConfigDataLocation::isNotEmpty).toList() : Collections.emptyList(); this.activate = activate; } static class Activate { private final @Nullable CloudPlatform onCloudPlatform; private final String @Nullable [] onProfile; } }也就是说,在配置文件中的以下配置:
yamlspring: config: import: - "classpath:a.yml" - "classpath:b.yml" activate: on-profile: dev on-cloud-platform: kubernetes可以映射为一个
ConfigDataProperties对象。Binder:把Environment/PropertySource里的配置项,按照 Spring Boot 的绑定规则,转换成 Java 对象。
从UNBOUND_IMPORT --> BOUND_IMPORT的转变,实际上就是从ConfigDataEnvironmentContributor中的配置源PropertySource<?> propertySource解析出来ConfigDataProperties properties:
java
class ConfigDataEnvironmentContributor implements Iterable<ConfigDataEnvironmentContributor> {

	private final @Nullable PropertySource<?> propertySource;

	private final @Nullable ConfigDataProperties properties;

	private final Map<ImportPhase, List<ConfigDataEnvironmentContributor>> children;

	private final Kind kind;
}接下来简单讲讲ConfigDataEnvironmentContributor的解析流程,源码(去除日志版本)主要在如下:
java
// ConfigDataEnvironmentContributors类中的方法

// importer ConfigDataLocation解析工具
// activationContext 当前环境中的启用信息,包括cloudPlatform和profiles,决定了某个ConfigDataEnvironmentContributor是否有效
ConfigDataEnvironmentContributors withProcessedImports(ConfigDataImporter importer,
                                                       @Nullable ConfigDataActivationContext activationContext) {
    // 根据activationContext,获取配置导入阶段(后续会详细讲解)
    ImportPhase importPhase = ImportPhase.get(activationContext);

    ConfigDataEnvironmentContributors result = this;
    // processed 表示处理过的 ConfigDataEnvironmentContributor,这里的处理是指从 一个配置文件中解析额外的配置文件
    int processed = 0;
    while (true) {
        // 从当前ConfigDataEnvironmentContributor树中获取下一个需要处理的contributor
        // 什么情况需要处理呢?
        // 1、contributor的类型为 UNBOUND_IMPORT
        // 2、contributor的类型为 BOUND_IMPORT,并且该contributor还没有解析出额外的配置文件
        ConfigDataEnvironmentContributor contributor = getNextToProcess(result, activationContext, importPhase);
        if (contributor == null) {
            // 没有需要处理的contributor,直接返回
            return result;
        }
        if (contributor.getKind() == Kind.UNBOUND_IMPORT) {
            // 如果 contributor 类型为UNBOUND_IMPORT,则解析出 ConfigDataProperties, 然后转换为BOUND_IMPORT类型的contributor
            ConfigDataEnvironmentContributor bound = contributor.withBoundProperties(result, activationContext);
            result = new ConfigDataEnvironmentContributors(this.logger, this.bootstrapContext,
                                                           result.getRoot().withReplacement(contributor, bound), this.conversionService,
                                                           this.environmentUpdateListener);
            continue;
        }
        // 如果 contributor 类型为 BOUND_IMPORT,主要就是将 spring.config.import 的内容,一条转换为一个新的ConfigDataEnvironmentContributor,将新生成的 contributor,作为子节点,加入到当前contributor下
        ConfigDataLocationResolverContext locationResolverContext = new ContributorConfigDataLocationResolverContext(
            result, contributor, activationContext);
        ConfigDataLoaderContext loaderContext = new ContributorDataLoaderContext(this);
        // 解析 spring.config.import 内容
        List<ConfigDataLocation> imports = contributor.getImports();
        Map<ConfigDataResolutionResult, ConfigData> imported = importer.resolveAndLoad(activationContext,
                                                                                       locationResolverContext, loaderContext, imports);
        // 将新生成的 contributor,作为子节点,加入到当前contributor下
        ConfigDataEnvironmentContributor contributorAndChildren = contributor.withChildren(importPhase,
                                                                                           asContributors(imported));
        // 用contributorAndChildren替换contributor, 生成新的 ConfigDataEnvironmentContributors
        result = new ConfigDataEnvironmentContributors(this.logger, this.bootstrapContext,
                                                       result.getRoot().withReplacement(contributor, contributorAndChildren), this.conversionService,
                                                       this.environmentUpdateListener);
        processed++;
    }
}总计ConfigDataEnvironmentContributor的解析就分为两步:
- 第一步:从
UNBOUND_IMPORT转换为BOUND_IMPORT; - 第二步:解析
BOUND_IMPORT节点,主要是解析spring.config.import配置,生成新的ConfigDataEnvironmentContributor,作为子节点挂载到当前节点下;
所以整个流程图示如下:
3.1.5 ConfigDataEnvironment
ConfigDataEnvironment 是 Spring Boot Config Data 加载机制的核心编排类,负责协调初始配置加载、ConfigData 导入、Profile 激活、Contributor 处理,并最终将有效的 PropertySource 应用到 Environment。
ConfigDataEnvironment中的核心方法如下:
java
void processAndApply() {
    // 创建ConfigDataImporter,用于解析ConfigDataLocation
    ConfigDataImporter importer = new ConfigDataImporter(this.logFactory, this.notFoundAction, this.resolvers,
                                                         this.loaders);
    // 注册Binder,用于绑定配置到Java对象
    registerBootstrapBinder(this.contributors, null, DENY_INACTIVE_BINDING);
    // 第一次解析配置:这一步是根据初始节点(INITIAL_IMPORT)解析出所有该解析的配置
    ConfigDataEnvironmentContributors contributors = processInitial(this.contributors, importer);
    // 根据解析出来的配置,计算目前环境上下文,主要是cloudPlatform,没有profile
    ConfigDataActivationContext activationContext = createActivationContext(
        contributors.getBinder(null, BinderOption.FAIL_ON_BIND_TO_INACTIVE_SOURCE));
    // 第二次解析配置:这一步是根据激活的cloudPlatform,再判断配置是不是要继续解析处理
    contributors = processWithoutProfiles(contributors, importer, activationContext);
    // 计算active profiles
    activationContext = withProfiles(contributors, activationContext);
    // 第三次解析:这一步是根据active profiles,继续加载配置
    contributors = processWithProfiles(contributors, importer, activationContext);
    // 最后将加载的配置应用到Environment中
    applyToEnvironment(contributors, activationContext, importer.getLoadedLocations(),
                       importer.getOptionalLocations());
}可以看到,Spring Boot Config Data加载配置,不是一次性加载完成的,而是经过了三次加载:
- 第一次:从
INITIAL_IMPORT ConfigDataEnvironmentContributor加载出所有可加载的配置; - 第二次:在解析了CloudPlatform的环境下,再继续加载在当前平台下可用的配置;
- 第三次:在解析了active profiles的环境下,再继续加载在active profiles下可用的配置;
假设现在有如下配置:
txt
resources
	a.yaml
	application.yaml
	application-test.yaml
	c.yaml
	d.yaml
spring.main.cloud-platform用来显式指定当前应用运行在哪一种 Cloud Platform 上。
配置文件内容如下:
yaml
# application.yaml
spring:
  main:
    cloud-platform: kubernetes  # 设置cloud-platform为kubernetes
  application:
    name: demo
  profiles:
    active: test                # 设置activa profiles
  config:
    import:                     # 引入其他配置文件 a.yaml和b.yaml,其中b.yaml是可选的
      - "classpath:a.yaml"
      - "optional:classpath:b.yaml"

# a.yaml
a: 1
spring:
  config:
    activate:
      on-cloud-platform: kubernetes     # 表示a.yaml只有在cloud-platform为kubernetes时生效
    import:
      - "classpath:c.yaml"              # 引入 c.yaml

# c.yaml
c: 1
spring:
  config:
    activate:
      on-cloud-platform: AWS_ECS         # 表示c.yaml只有在cloud-platform为AWS_ECS时生效
    import:
      - "classpath:d.yaml"               # 引入d.yaml

# d.yaml
d: 4

#application-test.yaml
test: true当执行完processInitial()后,加载的配置树如下:
执行完以下代码后:
java
// 根据解析出来的配置,计算目前环境上下文,主要是cloudPlatform,没有profile
ConfigDataActivationContext activationContext = createActivationContext(
contributors.getBinder(null, BinderOption.FAIL_ON_BIND_TO_INACTIVE_SOURCE));当前上下文如下:

之后,执行第二次配置加载,processWithoutProfiles(contributors, importer, activationContext),配置树如下:
之后,加载active profiles:

最后,加载第三次配置文件:
由于c.yaml是在prod环境下才加载的,所以d.yaml并没有加载。
最后,将加载出来的配置文件应用到容器环境中:
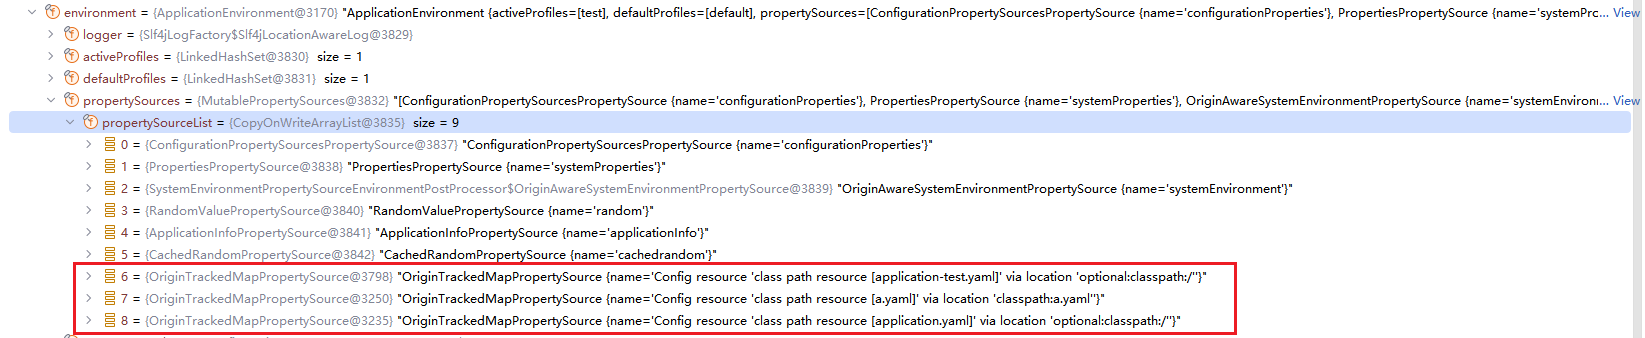
可以发现,c.yaml也没有生效。
以上就是Spring Boot Config Data的加载流程,还有一些细节没有提交,例如加载分为两阶段:BEFORE_PROFILE_ACTIVATION和AFTER_PROFILE_ACTIVATION,是如何找到application.yaml文件的等等,不过掌握了整体流程,这些细节应该都能通过跟踪源码理解。
3.1.6 ConfigDataEnvironmentPostProcessor和EnvironmentPostProcessorApplicationListener
Spring Boot Config Data 的加载流程由EnvironmentPostProcessorApplicationListener,当监听到ApplicationEnvironmentPreparedEvent时间后开始处理,在onApplicationEnvironmentPreparedEvent中会调用EnvironmentPostProcessor.postProcessEnvironment:
java
// EnvironmentPostProcessorApplicationListener
private void onApplicationEnvironmentPreparedEvent(ApplicationEnvironmentPreparedEvent event) {
  ConfigurableEnvironment environment = event.getEnvironment();
  SpringApplication application = event.getSpringApplication();
  List<EnvironmentPostProcessor> postProcessors = getEnvironmentPostProcessors(application.getResourceLoader(),
      event.getBootstrapContext());
  addAotGeneratedEnvironmentPostProcessorIfNecessary(postProcessors, application);
  for (EnvironmentPostProcessor postProcessor : postProcessors) {
    postProcessor.postProcessEnvironment(environment, application);
  }
}ConfigDataEnvironmentPostProcessor的postProcessEnvironment如下:
java
void postProcessEnvironment(ConfigurableEnvironment environment, @Nullable ResourceLoader resourceLoader,
                            Collection<String> additionalProfiles) {
    this.logger.trace("Post-processing environment to add config data");
    resourceLoader = (resourceLoader != null) ? resourceLoader : new DefaultResourceLoader();
    getConfigDataEnvironment(environment, resourceLoader, additionalProfiles).processAndApply();
}3.2 Nacos实践
Spring Boot官方推荐的扩展流程如下:
- 实现
ConfigDataResource用于定义资源; - 实现
ConfigDataLocationResolver用于将ConfigDataLocation解析为自定义的ConfigDataResource; - 实现
ConfigDataLoader用于将自定义的ConfigDataResource解析为ConfigData; - 在
META-INF/spring.factories中注册自定义的ConfigDataLocationResolver和ConfigDataLoader;
本小节以Nacos为例,介绍如何扩展Config Data配置加载。首先,引入Nacos:
xml
<dependency>
    <groupId>com.alibaba.cloud</groupId>
    <artifactId>spring-cloud-starter-alibaba-nacos-config</artifactId>
    <version>2025.1.0.0</version>
    <scope>compile</scope>
</dependency>在spring-alibaba-nacos-config中,实现了NacosConfigDataResource,其中包含NacosItemConfig:
java
public class NacosConfigDataResource extends ConfigDataResource {

	private final NacosItemConfig config;

    public static class NacosItemConfig {
		private String group;
		private String dataId;
		private String suffix;
		private boolean refreshEnabled;
		private String preference;
    }
}自定义了NacosConfigDataLocationResolver:
java
public class NacosConfigDataLocationResolver
		implements ConfigDataLocationResolver<NacosConfigDataResource>, Ordered {
    	@Override
	public boolean isResolvable(ConfigDataLocationResolverContext context,
			ConfigDataLocation location) {
        // getPrefix() 为nacos,只有以nacos开头的配置路径,NacosConfigDataLocationResolver才能解析
		if (!location.hasPrefix(getPrefix())) {
			return false;
		}
		String prefix = NacosPropertiesPrefixer.getPrefix(context.getBinder());

		return context.getBinder()
				.bind(prefix + ".config.enabled", Boolean.class)
				.orElse(true);
	}

    // 没有active profiles时,返回空列表
    @Override
	public List<NacosConfigDataResource> resolve(
			ConfigDataLocationResolverContext context, ConfigDataLocation location)
			throws ConfigDataLocationNotFoundException,
			ConfigDataResourceNotFoundException {
		return Collections.emptyList();
	}

    // 只解析active profiles时的配置资源
    @Override
	public List<NacosConfigDataResource> resolveProfileSpecific(
			ConfigDataLocationResolverContext resolverContext,
			ConfigDataLocation location, Profiles profiles)
			throws ConfigDataLocationNotFoundException {
		NacosConfigProperties properties = loadProperties(resolverContext);

		ConfigurableBootstrapContext bootstrapContext = resolverContext
				.getBootstrapContext();

		bootstrapContext.registerIfAbsent(NacosConfigProperties.class,
				BootstrapRegistry.InstanceSupplier.of(properties));

		registerConfigManager(properties, bootstrapContext, resolverContext);

		return loadConfigDataResources(location, profiles, properties);
	}
}自定义了NacosConfigDataLoader:
java
public class NacosConfigDataLoader implements ConfigDataLoader<NacosConfigDataResource> {
    	public ConfigData doLoad(ConfigDataLoaderContext context,
			NacosConfigDataResource resource) {
		try {
			ConfigService configService = getBean(context, NacosConfigManager.class)
					.getConfigService();
			NacosConfigProperties properties = getBean(context,
					NacosConfigProperties.class);

			NacosItemConfig config = resource.getConfig();
			// pull config from nacos
			List<PropertySource<?>> propertySources = pullConfig(configService,
					config.getGroup(), config.getDataId(), config.getSuffix(),
					properties.getTimeout());

			NacosPropertySource propertySource = new NacosPropertySource(propertySources,
					config.getGroup(), config.getDataId(), new Date(),
					config.isRefreshEnabled());

			NacosPropertySourceRepository.collectNacosPropertySource(propertySource);

			return new ConfigData(propertySources, getOptions(context, resource));
		}
		catch (Exception e) {
			log.error("Error getting properties from nacos: " + resource, e);
			if (!resource.isOptional()) {
				throw new ConfigDataResourceNotFoundException(resource, e);
			}
		}
		return null;
	}
}核心就是从nacos配置服务器中拉取配置,在底层仍然是通过PropertySourceLoader获取配置的,Nacos提供了两个实现:

最后就是注册组件:
txt
org.springframework.boot.diagnostics.FailureAnalyzer=\
com.alibaba.cloud.nacos.diagnostics.analyzer.NacosConnectionFailureAnalyzer

org.springframework.boot.env.PropertySourceLoader=\
com.alibaba.cloud.nacos.parser.NacosJsonPropertySourceLoader,\
com.alibaba.cloud.nacos.parser.NacosXmlPropertySourceLoader

# ConfigData Location Resolvers
org.springframework.boot.context.config.ConfigDataLocationResolver=\
com.alibaba.cloud.nacos.configdata.NacosConfigDataLocationResolver

# ConfigData Loaders
org.springframework.boot.context.config.ConfigDataLoader=\
com.alibaba.cloud.nacos.configdata.NacosConfigDataLoader参考资料
[2] https://github.com/spring-cloud/spring-cloud-commons/tree/main/spring-cloud-context
[4] Spring Boot引入外部配置:https://docs.spring.io/spring-boot/reference/features/external-config.html#features.external-config.files.importing